Text fields in a document can contain static text, data fields, auto text codes, or combinations of these text types. When you add a new text field, its formatting is determined by the control defaults, but you can change any of the formatting options. The following list provides some useful formatting suggestions:
Make the text field appear three-dimensional, like a button, with the 3D effect. For steps, see Applying 3D effects to controls.
Let the content behind the text field show through by setting the backstyle to transparent. For steps, see Applying a transparent background to controls.
"Float" the text field above the background by using a drop shadow. For steps, see Applying drop shadows.
Create a gradual color change by blending two colors using gradient colors. For steps, see Applying gradient colors.
Display pop-up text (a tooltip) when a user positions the cursor over the control. The tooltip can provide extra information, such as an expanded description of a metric. For steps, see Creating pop-up tooltips.
Set Number formatting options such as decimal spaces, currency symbols, time formats, zip code formats, and so on. For steps, see Number formatting.
Display information to other document designers in Design Mode while hiding it from users viewing the document in Interactive Mode, Editable Mode, Express Mode, or Flash Mode. To do this, you hide the control that contains the information by using the Visible property. For instance, you could include a note in a text field about the source of data. For steps, see Hiding a control.
Change Text layout options such as word wrap and padding, control how the text is displayed within the borders of the text field. For steps, see Vertical text and padding.
Display a scroll bar if the text does not fit in within the size of the text field. For example, if the height of a text field is fixed, the text field does not expand to fit the contents. In Express Mode and Interactive Mode in MicroStrategy Web, and when the document is exported to HTML, a user can scroll through all of the text if scroll bars are displayed. The alternative is that only the text that can fit within the size of the text field is displayed.
Format the font of the text in the text field, including style, size, and color. When you add a new text field, its formatting is determined by the control defaults. However, you can change the formatting and appearance.
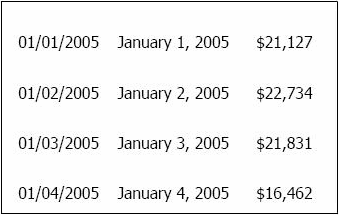
Number formatting options include decimal spaces, currency symbols, time formats, percentage formats and so on. For example, the text fields in the following document sample have different number formats applied to them. The one on the left is a date in the MM/DD/YYYY format, while the one in the middle, another date, is in the Month Date, Year format. The text field on the right is a number formatted as currency, with no decimal.

PDF View must be enabled.
Open a document in Design or Editable Mode. Use a document with a dataset that contains dates and numbers.
Add two date data fields and a numeric data field, as shown in the image above.
Click the Insert tab and then click Text.
Add the text field to any section in the document.
Right click in the text field, and then click Properties and Formatting. The Properties and Formatting dialog box opens.
In the Format section, select Number.
Select 04/07/1998 in the Type list.
Click OK to return to the document.
Select the middle text field.
Repeat steps 4-6 above, except this time, select April 4, 1998 from the Type list.
Select the text field on the right.
Select Number from the Format section of the Properties and Formatting dialog box.
Select Currency from the Number list.
Type 0 (zero) in the Decimal places field.
Type $ in the Currency symbol field.
Select the appropriate option from the Currency position drop-down list.
Click OK to return to the document.
To view the results, from the Home menu select Export and then PDF.
Padding defines the space between the text and the borders of the text field (left, right, top, and bottom).
For example, the Top padding property defines the space between the text and the top border of the text field. For the horizontal text field shown below, it is set to 10. All other padding values remain at the default of one. The height mode is set to fixed, so that the text field does not expand to fit the contents. Copy the text field and set Text direction to 90 Degrees to display the text field vertically. Update the text to reflect its new position. As shown in the image below, Top padding still defines the space between the text and the top border of the text field.

Open the document in Design or Editable Mode.
Create a text field:
From the Insert menu, select Text.
Add the text field to any section of the document.
Right-click in the text field and then select Properties and Formatting. The Properties and Formatting dialog box opens.
From the Format category select Alignment.
In the Padding section type a measurement value in the Left, Top, Right, and Bottom fields.
Click OK to return to the document.
Related topics